
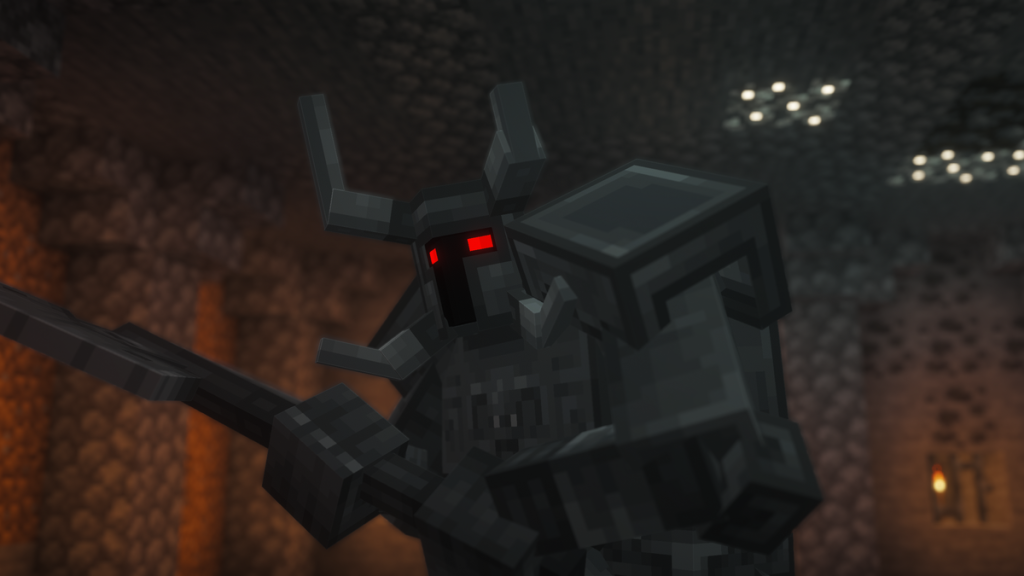

The Ferrous Wroughtnaut is a massive, iron-armored boss that guards its underground lair from all who disturb it. What makes this fight unlike any other in Mowzie’s Mobs is a single, defining rule: the Wroughtnaut is completely immune to all damage unless you catch it from behind during its overhead axe slam.
Land that window correctly and it falls fast. Miss it and your hits bounce off like rain on stone. Every decision in this fight comes down to that one moment. The Wroughtnaut hits for 30 per swing, which is 15 hearts per hit.
A single swing at full health will kill an unarmored player immediately and severely wound even heavily armored ones. Its knockback resistance is total, meaning you cannot stagger it, push it away, or create space with impact. The fight is purely on its terms until you provoke the overhead slam.
Location
The Wroughtnaut lives inside the Wrought Chamber, a hand-crafted underground structure that generates in virtually every biome except ocean biomes. The chamber spawns in the mid-depth underground layer, roughly between Y 20 and Y 50, tucked against a cave wall with enough headroom above it.

You are unlikely to stumble across it by accident, since it does not mark itself on your map and the entrance blends into the surrounding rock.
You can use the locate command to track down a nearby Wrought Chamber. Because the structure spawns in non-ocean terrain across the whole overworld, most worlds will have one within reasonable distance of spawn.
Behavior
The Wroughtnaut begins completely dormant, standing frozen in its chamber like a statue. It does not react to sound, light, or players watching from a distance. The moment a player steps within about 4 blocks, it stirs, plays a rising activation animation, and immediately begins tracking its target.

If you then retreat far enough and it loses sight of you, it walks back to its original position and goes dormant again. During dormancy it heals quickly, recovering around 6 HP per second, so a strategy of retreating to heal and returning will work against you unless you commit to ending the fight.
The Wroughtnaut’s health also resets if you die and respawn near it. Respawning to retry the fight always means starting from full health on its side, which heavily penalizes reckless attempts. Bring your best gear before getting close.
Attacks
Once active, the Wroughtnaut chases you at a steady pace and attacks with its massive axe. Its standard attack is a single horizontal swing dealing 30 damage in a wide arc up to about 5 blocks away.

At about 90% health or below, it begins chaining a second swing immediately after, and at 60% health or below it may follow with a third sweeping strike that hits in a full 360-degree circle around it. The combo escalates as the fight wears on, meaning the longer you let it live, the more dangerous its melee routine becomes.
Single Swing
Standard attack: 30 damage in a ~100-degree arc, 5-block range. Used at any health level.
Double Swing
Chains from the single swing below 90% health (60% chance). Second hit deals the same 30 damage.
Triple Sweep
Chains from the double swing below 60% health (60% chance). Third hit covers 360 degrees around the Wroughtnaut.
The Stomp is a different kind of attack, triggered roughly every 10 seconds when you are within 6 blocks. The Wroughtnaut slams the ground and sends a shockwave ring expanding outward, launching nearby blocks as projectiles and throwing you into the air.
The direct damage from the shockwave is low, but the knockback and falling blocks create real danger, especially in a tight chamber. Stay outside 6 blocks when possible to avoid triggering it.
Vulnerability Window
The Ferrous Wroughtnaut is completely immune to all player damage except during its overhead axe slam, and even then, only hits from the rear connect. Hitting it from the front at any time deals no damage.
When the Wroughtnaut rears back and drives its axe into the ground, watch for the moment it stops moving after the impact. That landing opens a vulnerability window of roughly 3 seconds where its back is exposed and it stops tracking you.
During this window, dash around to its back and strike. The frontal arc, covering about 220 degrees of the Wroughtnaut’s facing, remains protected even while the axe is planted, so a shallow angle or a hit from the side will still be deflected with a metallic clang.

The overhead slam itself hits for 45 damage in a narrow 5-block arc directly in front of the Wroughtnaut. After the impact, the ground shakes and the camera jolts, giving you a clear cue that the window is open. You have about 3 seconds before it pulls the axe free and closes the gap.
Once the axe is planted, its handle visibly protrudes from behind the Wroughtnaut, positioning yourself so you can see that exposed shaft is a reliable confirmation that you are far enough around its back to connect. The Wroughtnaut also triggers this attack more frequently as a random move during the fight, so do not wait passively for it. Provoke it by staying close and facing it directly so it chooses the slam over its standard swings.
Drops
Ferrous Wroughtnaut Drops

 Wrought Helm
Both items drop every time when you land the killing blow. The  Axe of a Thousand Metals and the Wrought Helm are the two unique rewards from this fight and the only way to obtain them.
Wrought Helm
The Wrought Helm is an unbreakable helmet with iron-level armor protection and 10% knockback resistance. It never degrades in your inventory, making it a permanent piece of kit that you can carry into any fight without worrying about maintenance. Its custom model sets it apart visually from any vanilla armor piece.
Axe of a Thousand Metals

The Axe of a Thousand Metals is an unbreakable weapon with a strong base melee attack and two unique right-click abilities. Right-clicking swings the axe in a massive 160-degree horizontal arc up to 4 blocks around you, perfect for hitting multiple targets.
Crouching and right-clicking while on the ground brings the axe down in a vertical slam followed by an expanding shockwave up to 16 blocks that launches blocks and knocks enemies back hard. Its left-click attack speed is very slow at under 1 swing per second, so the right-click abilities are your primary combat tools.
Tips
Use the pre-fight time wisely. The Wroughtnaut is dormant and not moving before you enter its range. Once it wakes you need to commit, because retreating too far resets its health over time. Stay close and face it directly. The Wroughtnaut only uses its overhead slam when you are within 3 or 4 blocks and it is already looking at you.
Dodge by stepping back or to the side, not by circling. When the Wroughtnaut winds up a swing, moving straight back or laterally clears the arc more reliably than trying to run around it circling during the attack animation often puts you inside the strike zone instead of out of it. Save the sprint around to its back for after the axe is already planted.
Time your move to its back with the axe-landing camera shake. That rumble is a reliable cue that the window is open. Sprint around the side of the Wroughtnaut immediately after the impact, land two or three hits, and then step clear before it pulls the axe free. Trying to hit it before it fully plants the axe risks striking from the wrong angle and getting nothing for it.
Heavy armor is essential. A 30-damage swing will kill or nearly kill you without it. Diamond armor or better is strongly recommended, and pairing it with the Wrought Helm’s knockback resistance can help you stay stable after getting clipped. Regeneration potions or Healing potions give you a recovery buffer during those moments when you get hit repositioning after the slam.
Watch for the Triple Sweep at lower health. Once the Wroughtnaut drops below 60%, its combo chain can end in a full 360-degree strike. After you land your hits during the vulnerability window and the Wroughtnaut recovers, give it a moment of space before closing in again so you are not caught inside a Triple Sweep during the transition.
FAQ
The Ferrous Wroughtnaut lives in the Wrought Chamber, an underground structure that generates in every non-ocean biome between roughly Y 20 and Y 50. Use /locate structure mowziesmobs:wrought_chamber to find the nearest one. The structure blends into cave walls, so you may walk past it without noticing unless you look carefully at carved stone formations in the mid-depth underground.
Wait for the Wroughtnaut to perform its overhead axe slam. When the axe hits the ground and the camera shakes, the Wroughtnaut becomes vulnerable for about 3 seconds. Immediately sprint around to its back and attack from behind. The axe handle will be visibly sticking out behind it, which confirms you are on the correct side to connect. Hitting it from the front, even during this window, deals no damage. Outside of this animation, it is completely immune to all player attacks.
The Ferrous Wroughtnaut drops both the Wrought Helm and the Axe of a Thousand Metals at 100% chance when killed by a player. These are its only drops and the only way to obtain these items in survival. Both items are unbreakable by default.
Ranged attacks from a bow or crossbow count as entity-sourced damage, which the Wroughtnaut blocks completely outside the vulnerability window. During the window, a well-placed arrow from behind the Wroughtnaut should connect. However, the tight timing and the need to be behind it make melee far more reliable for consistently landing hits in the 3-second opening.
The Wroughtnaut heals about 6 HP per second while it is dormant and not actively fighting. If you step out of its range and it returns to its resting position, it starts recovering health immediately. Committing to the fight and staying within its range is the only way to prevent this. Additionally, if you die and respawn near the Wroughtnaut, its health fully resets, so avoid dying during the fight if at all possible.
The Axe of a Thousand Metals is a strong general-purpose weapon that never breaks. Its right-click horizontal swing covers a 160-degree arc up to 4 blocks away, making it excellent for hitting groups of mobs. The crouching right-click ground slam creates an expanding shockwave up to 16 blocks that launches blocks and pushes enemies back hard, useful for crowd control in open areas. Because it never runs out of durability, it remains a viable weapon for the rest of your playthrough.


