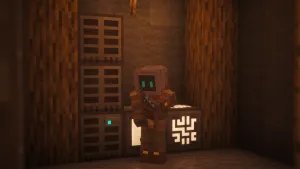
The Storage Controller is the block that joins your Sophisticated Storage containers into one network. You’ll be able to deposit into every connected  Chest,
 Barrel and
 Shulker Box from it, and pipe items in and out of the whole group as if it were a single block.
It doesn’t have a menu of its own though, which catches a lot of people out, and right-clicking it with an empty hand won’t open anything. Each container still has to be opened to look inside it, or a terminal from another storage mod can be connected if you’d like to browse everything in one place.
Crafting the Controller
The Storage Controller is crafted at a  Crafting Table from 4 Stone, 2
 Redstone Comparators and 2 Planks, with one of the mod’s basic wooden Chests or Barrels in the middle. Any wood works for both, but it does have to be a basic one, as a higher tier container won’t fit in the recipe.


One Controller is all a network needs. It needs a Pickaxe to be picked back up and drops as an item, keeping any decoration you gave it, and the containers keep all of their items when it’s broken, as the Controller doesn’t hold anything itself.
Setting Up a Network

Setting a network up only takes a minute, and it doesn’t matter what order you place things in. A container placed next to the Controller, or next to anything that’s already connected, joins straight away, and a Controller placed against an existing wall of storage will pick up the whole wall.
Arrange Your Storage
Place it touching
Place your Chests, Barrels and Shulker Boxes so each one touches at least one other. Vanilla Chests won’t join, so any you’ve already got will need a  Basic Tier Upgrade on them first, which keeps all of their items.

A solid wall or block of containers works best, as every container has to lead back to the Controller through other containers or Storage Connectors. Gaps are fine as long as something bridges them, and you’re able to keep adding to the wall later on.
Add the Controller
Place it against the group
Set the Controller against any container in the group, it can go on any side. It’ll search out every connected container within range as soon as it’s placed, and the whole group becomes one network straight away.

To check what’s connected, hold a Storage Tool in its linking mode, and every container in the network gets a green outline, with linked blocks outlined in lime and joined to the Controller by a line. With the Storage Tool in your off hand and an item in your main hand, the containers that item would go into are highlighted instead.
Bridge and Expand
Cross gaps and join groups
Use a  Storage Connector to fill a gap between containers that don’t touch. For a separate group across the room, place a
 Storage Link against it, then switch a
 Storage Tool to its linking mode and use it on the Controller first and the Link second.

 4


Deposit or Automate
Right-click or pipe
Right-click the Controller to put items into the network by hand. For automation you’re able to connect  Hoppers and pipes straight to it, or to a
 Storage Input,
 Storage Output or
 Storage I/O placed anywhere in the network.
Getting Items In and Out
How to Access Your Items
Since there’s no menu, you’ll get at the network’s items in one of two ways. Either open the container that holds them, which the Storage Tool helps with by showing counts and fill levels on each block, or connect a storage terminal from another mod.
The Controller acts as one big inventory to anything that connects to it, which is why a terminal works. In a pack like All the Mods you might point an Applied Energistics 2 Storage Bus, a Refined Storage External Storage or a Tom’s Simple Storage Inventory Connector at it.
Depositing Items
Right-click the Controller while holding a stack and it’ll go into the network, but only if the network already has a home for it. That means the same item stored somewhere, a container locked to it or memorizing it, or a  Filter Upgrade that allows it.
Right-click twice quickly and it’ll do the same for your whole inventory, moving every stack the network already holds and leaving anything new with you. If something won’t go in, put one of it in a container by hand first, after that the Controller will take the rest.

Items always go to a container that already holds the same item first, then to containers that are memorizing or filtered for it. Brand new items can be brought in by pipes and Hoppers too, they go into any container with a free slot, so it’s worth locking the ones you’d like kept separate.
Applying Upgrades to the Whole Network
The Controller passes upgrades along as well. Right-click it with a stack of upgrades and it’ll put one into each connected container that has room for it, whereas sneaking as you do it keeps adding from the stack until the slots are full.
Holding a Tier Upgrade, a right-click will try to upgrade every connected container at once, using one Tier Upgrade for each of them. It’s a lot quicker than clicking every Chest in a big room, so it’s worth placing the Controller before you start upgrading.
Range and Expanding the Network
By default the Controller reaches 15 blocks in every direction, so the network has to fit inside that cube around it. Every container also has to lead back to it through touching containers or Connectors, as a container sitting on its own inside the range won’t be joined.
The range can be changed in the server config, anywhere from 4 to 64 blocks, under the setting called controllerRange. A Storage Link doesn’t make it reach any further either, so if a Link won’t connect, the group it’s on is almost always too far away.
A few other blocks are used around the Controller, and each of them has a job of its own. These are the ones you’ll reach for once a network grows past a single wall, and none of them hold any items themselves.
Bridges a gap between containers that don’t touch, so a network is able to run along a wall, through a doorway or around a corner. They’re crafted 4 at a time, which makes them the cheap way to keep a long wall joined up.
Joins a separate group of containers to the Controller once it’s been linked with the Storage Tool. The group still has to sit inside the Controller’s range, so it’s for storage that’s nearby but not touching the main wall.
Gives Hoppers and pipes another point to push items into the network or pull them back out of it. It’s handy when the Controller itself is buried in the middle of a wall, as the I/O can go anywhere the network reaches.
For one-way automation, a Storage Input only takes items in and is built to be easy on the server, whereas a Storage Output only lets them out. A Hopper or pipe on the Controller itself works fine for smaller builds, as it acts as an access point too.
FAQ
The Storage Controller has no screen at all, so there’s no terminal to search and no crafting grid on it. What it does instead is act as one big inventory for the whole network, so it takes deposits by right-click, passes upgrades to every container, and lets pipes or another mod’s terminal reach every item.
A hand deposit only works when the network already has a home for the item. Store one of it in a container by hand, lock or memorize a slot for it, or add a Filter Upgrade that allows it, and after that the Controller will take the rest.
By default it reaches 15 blocks in every direction, and every container has to connect back to it through touching containers or Storage Connectors. A Storage Link lets a separate group join, but that group still has to be inside the same range.
The range is a server config setting called controllerRange, which can be set anywhere from 4 to 64 blocks. There isn’t an upgrade or item that raises it in game, so in a modpack it’s whatever the pack has set.