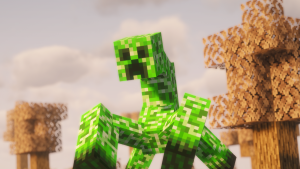
The Obliterator is the final boss of the Legendary Monsters mod, and he is fought inside the Space Station, which generates in The End. He doesn’t spawn on his own, you will need to bring an  Eye Crystal to the
 Teleport Machine in the middle of the station. He has 450 health, which equates to 225 hearts, and the fight goes through three phases.
Beating The Obliterator is the only way to get  Portal Shards, which are needed for
 The Tesseract, the
 Atom Splitter and the Annihilator’s Armor Set. He can be summoned as many times as you have Eye Crystals, and each Space Station only has three, so don’t waste them. Most of what makes him hard is the teleporting, he rarely stays where you left him.
Location
You will only ever find The Obliterator in the Space Station, which is the mod’s End structure. Space Stations generate high up in the End Highlands, the End Midlands and the Small End Islands, around 110 chunks apart, and never within a few chunks of an End City. With cheats enabled, the locate command further down gives you the coordinates of the nearest one.
Without cheats, you’ll want to craft an  Eye Of Annihilation, which is 4
 Enderitium Gems placed around an
 Eye of Ender.
 Enderitium Ore generates in
 End Stone all over The End, so the gems are easy to mine before you set off.


Throw the eye like an Eye of Ender and it’ll fly toward the nearest Space Station within about 100 chunks. About one throw in five it shatters instead of dropping back down, so craft a few and carry spare Gems to make more.
You’ll find the Teleport Machine in the main part of the station, along with the mobs that guard it. There are three Annihilation Pursuers, one in the central tower and one in each wing, and they are the minibosses that drop the Eye Crystal. You will have to beat one before The Obliterator can be summoned, as the Eye Crystal doesn’t come from anywhere else.
Behavior
Once the Eye Crystal is used on the Teleport Machine, it charges for a few seconds and The Obliterator appears just above it. He can’t be damaged during his arrival, which lasts around 8 seconds, so use it to get into position. From then on he teleports constantly, either straight to you or away to fire a laser, and he might grab you and carry you into the air.
Attacks
Nearly every attack The Obliterator has adds a percentage of your maximum health on top of its base damage, so more hearts will only help so much. Every hit he lands also stacks a debuff called Annihilation, which cuts your attack speed by 10% per level for 10 seconds, up to 5 levels. The table below covers the attacks you will see most, with the damage listed before armor.
| Attack | Phase | Damage | What to Know |
|---|---|---|---|
| Double Slash | 1 to 3 | 18 + 3%, twice | His basic combo up close, and he’ll often teleport to you first |
| Kick Smash | 1 to 3 | 18 + 4%, then 19 + 4% | The kick Stuns you for 2.5 seconds and disables a Shield for 7.5 seconds |
| Teleport Grab | 1 to 3 | 17 + 3%, then 12 + 10% | He grabs you, jumps and slams you down, you can’t hurt him while he’s holding you |
| Jump Teleport Slam | 1 to 3 | 21 + 5% | A leap and a landing slam, disables a Shield for 8 seconds |
| Single Shot Laser | 1 to 3 | 8.5 + 5% | He teleports away first, then fires |
| Annihilation Bombs | 1 to 3 | 10, or 8 per small bomb | Thrown from up to 12 blocks away |
| Clone Burst | 2 and 3 | 10 + 8% in 8 blocks | Clones punch for 7% of your max health each, portals for 5% |
| Quad Laser | 2 and 3 | 7.5 + 5% per beam | Four sweeping beams at once after a teleport |
| Ultimate | 3 | 12 + 8%, twice, plus a 17 shockwave | Used within 7 blocks, once every 30 seconds |
You’ll want to learn the Kick Smash first, as the Stun from the kick leaves you unable to move, block or use items while the second hit comes in. The Teleport Grab is the other big one, being grabbed means a guaranteed slam and a few seconds where your hits do nothing. Both start with The Obliterator teleporting right next to you, so the moment he vanishes, move sideways.
Phases
There’s three phases to the fight, and each change is set off by his health rather than time. He will stop and transform at 65% health, which is around 292, and again at 30%, which is around 135. He can’t be damaged while transforming, and just before each change your hits only deal half damage, so the last few hits before a phase will seem weak.
First Phase
Above 65% health
In the first phase The Obliterator is completely immune to  Arrows and other projectiles, so a
 Bow is useless until he has changed. He will use his slashes, kicks, grabs and the single laser, and he teleports to close the gap whenever you back off. It’s the slowest phase of the three, which makes it the best time to get a feel for how quickly his combos come out.
Second Phase
Below 65% / 292 health
The second phase adds the Clone Burst and the Quad Laser, and projectiles will start working again. Clones of The Obliterator appear around you and punch for a percentage of your health, so they hurt just as much in Netherite as they do in Iron. Keep moving through them rather than trying to fight each one, as they don’t last long.
Third Phase
Below 30% / 135 health
The sky goes dark in the third phase, and he gains the Ultimate along with a block. If you’re within 6 blocks while he is standing idle, he will raise an arm and block any hit over 1 damage. The Ultimate is used when you’re within 7 blocks, and it’s two bursts of flame and a shockwave. The safest place to be is just outside his melee reach.
Special Mechanics
Like the other bosses, The Obliterator has a damage cap, so no single hit can deal more than 20 to him, whatever you are swinging. After each hit he is immune for half a second, and any hit within 1.5 seconds of the previous one only deals half damage. So the fight rewards a steady rhythm of hits about a second and a half apart, rather than spam clicking.
Damage is ignored whenever you’re more than 4 blocks above or below him, or more than 15 blocks away from him. Pillaring up or shooting from a ledge does nothing at all. He will also break the blocks around himself every couple of hits, so boxing him in doesn’t last.
He’s immune to fire and fall damage, and potion effects can’t be applied to him at all, so Poison, Slowness and Weakness are wasted. Every melee hit he lands will also interrupt you if you’re eating, and it knocks any Resistance effect above level II back down to level I. That makes  Golden Apples something to eat at a distance rather than mid fight.
Heavy Armor Makes It Worse
There’s one more thing to know if you’re using modded armor. If your armor value is above 20, which is where a full set of Netherite sits, The Obliterator will deal 7.5% more damage for every point above it. Stacking heavily armored gear from other mods doesn’t make the fight easier, it mostly cancels itself out. A normal Netherite set with Protection IV is about as good as it gets.
If he is left with nobody to fight for a few seconds, he will start to heal, and once he is back above a phase threshold he drops down a phase as well. A failed attempt means the whole fight over again, though the Eye Crystal is only used on the summon. Dying doesn’t remove him, so you can come back and carry on.
Drops
When he dies, The Obliterator will always drop between 2 and 4 Portal Shards, along with 100 experience, and nothing else, as Looting doesn’t change the amount. Portal Shards are the mod’s final crafting ingredient, they’re what gates all three of the end game items.
The Obliterator Drops
 Portal Shard
Each piece of the Annihilator’s Armor Set costs 1 Portal Shard at a  Smithing Table, on top of the Netherite piece and an Annihilator Upgrade Smithing Template. The Tesseract and the Atom Splitter cost 2 Portal Shards each, along with
 Enderitium Ingots and a
 Bottle Of Annihilation. That’s 8 shards for everything, so you’re looking at 2 to 4 fights to get the full set.






Every fight needs a fresh Eye Crystal, and each Space Station has three Annihilation Pursuers to drop them, so one station gives you three attempts. The Eye Crystal also goes into the  Buckler Of Annihilation, so don’t craft the Shield before summoning the boss. Plan the shards out too, as 2 of them go further on The Tesseract than on a single boot.
Strategy
Bring a Sword with Sharpness rather than anything slow or heavy, as the 20 damage cap means a  Netherite Sword already hits it. Full Netherite with Protection IV is the armor to wear, and there’s no point going above that. A Shield is worth carrying for the slashes, but don’t rely on it, since the kicks and slams can disable it for up to 8 seconds at a time.
Clear the station before summoning him, so the Flameborn and the Wandering Eyes aren’t adding to the damage. Once the fight starts, keep him within 15 blocks and on your level, and pace your hits about a second and a half apart so none of them are halved. Whenever he teleports, step sideways straight away, as most of his combos start from right beside you.
In the third phase, stay just outside his reach unless you’re going in for a hit, as the Arm Block and the Ultimate are both triggered by standing close while he is idle.

Hit him during and just after his own attacks, when he can’t block. Save your Golden Apples for the moments after he teleports away to fire a laser, as that might be the only chance you get.
FAQ
You’ll only get an Eye Crystal from the Annihilation Pursuer, which is the miniboss found inside the Space Station in The End. Every kill will drop exactly one, along with a handful of Enderitium Gems. There are three Annihilation Pursuers in each Space Station, so one station gives you three Eye Crystals, and it can’t be crafted.
Right-click the Teleport Machine inside the Space Station while holding an Eye Crystal, which uses the crystal up. The machine will shake and charge for a few seconds, then The Obliterator appears just above it. You can summon him again with another Eye Crystal, as there’s no limit on how many times the machine can be used.
You’ll use Portal Shards to craft The Tesseract and the Atom Splitter, which need 2 each, and to upgrade Netherite armor into the Annihilator’s Armor Set at a Smithing Table, which needs 1 per piece. The Obliterator drops 2 to 4 of them per kill and they don’t come from anywhere else, so it takes 2 to 4 fights to craft everything.
Stay within 15 blocks and on his level, since damage from further away or from above is ignored, and space your hits out, as anything within 1.5 seconds of the last hit is halved. Step sideways every time he teleports to avoid the Kick Smash and the Teleport Grab. Projectiles only work from the second phase on, and keep out of his reach when he is idle in the third.