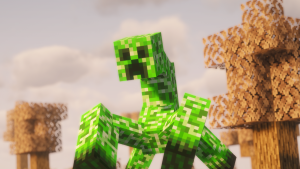
The Stratling is the one mob in the Legendary Monsters Cloudy Temple that won’t attack you, a two block tall figure that wanders the side rooms of the mountain dungeon. Nearly everything else inside goes for you the moment it notices you. Walking up to a Stratling puts a line on your action bar telling you to right-click to interact, which opens a trade screen rather than a fight.
What it deals in is  Amethyst Shards, and they’re one of the most common things in the temple’s own
 Chests, so the place more or less funds its own shop. That only holds while you leave them alone though, as a Stratling that takes a hit stops trading and starts swinging, and it’ll call every other one nearby over to help.
Spawning
Stratlings don’t spawn naturally anywhere in the world. They’re placed inside the Cloudy Temple when it generates and never despawn, so the ones there on your first visit will still be standing there whenever you come back. The side wings and smaller rooms are where they live, one or two to a room, while the central arena only holds Cumulonimbus and a pair of Hovering Hurricanes.
Biomes O’ Plenty and the Aether get a look in as well, since Highland, Ominous Woods, Jade Cliffs and Skyroot Meadow are all on the biome list when those mods are installed. None of that changes where the Stratlings sit, it just gives the temple more places to generate.
Temples sit about 70 chunks apart, so you might be traveling a fair way before one turns up. With cheats on, the locate command above gives you the nearest one straight away, and without them the  Eye Of Air does the same job from 4 Feathers around an Ender Pearl.


Throw the Eye like an Eye of Ender and follow it, as it points toward the nearest temple within about 100 chunks. About one throw in five it shatters instead of dropping back down, so craft a couple before you head for the mountains.
Behavior
A Stratling is neutral to players and has nothing in it that makes it hunt you down, so you can walk through a room full of them without anything happening.  Iron Golems and
 Snow Golems are the exception, as it will go for either of those on sight. It also refuses to fight Cumulonimbus, dropping the target again the moment the boss ends up on it.
What Turns One Hostile
Hitting one is the obvious way and it’ll come straight back at you. The less obvious one is containers, as opening any Chest or  Barrel within 10 blocks of a Stratling makes every Stratling in that radius turn on you at once, which is awkward because the containers and the traders share the same rooms.
Once a Stratling has a target it calls the others every few seconds, pulling in any within its 20 block follow range that don’t already have something to fight. Put that same 20 blocks between you and the room and things usually settle down again. A hostile Stratling won’t open its trade screen either, which is the part that actually costs you.
Any Chest or Barrel you open within 10 blocks of a Stratling will make every Stratling in range attack you, and none of them will trade until they’ve lost you again. Do your trading first and loot afterward, or put 10 blocks between you and the nearest one before you open anything.
The same rule applies to Barrels and  Ender Chests, as it’s the Chest screen itself that sets them off, not the block. So the storage room is the one to be careful in, as the Barrels are empty anyway and opening one costs you the traders.
Attacks
Once one is hostile it has two attacks, and neither is much on its own, as they’re built for a mob with 30 health rather than a boss. The table below shows how the two differ, as it’s the reach that catches people rather than the damage.
Slap
Uppercut
Both attacks cover a 180 degree arc in front of it and reach about 3 blocks up and down, so anything behind a Stratling is safe from either one. The Uppercut is the one that closes distance, starting from as far as 5 blocks out and lunging forward before the hit lands.

The Slap only goes off at close range, when you’re already right in its face. Neither attack can hurt another Stratling or Cumulonimbus, though it’ll catch anything else standing in the arc, including a Hovering Hurricane.
With 30 health and 5 armor it isn’t much of a fight on its own, and that’s rather the problem. A temple only holds a handful of them, each with its own set of offers, so every one you kill is a set of trades gone permanently.
Trading
Right-click a Stratling with any item except a  Villager Spawn Egg and the trade screen opens, as long as you aren’t sneaking and it hasn’t got a target. Sneaking is also how you slip past one without opening anything, handy when you’re backing through a doorway mid fight.

Each Stratling carries 7 offers, drawn at random from a pool of 16, and Amethyst Shards are the currency for most of them. A few run the other way and buy items off you for Shards instead.
| Give | Get | Uses |
|---|---|---|
| 8-32 Amethyst Shard | 1 Enchanted Book | 10 |
| 12-48 Amethyst Shard | 1 Enchanted Book | 2 |
| 8-12 Amethyst Shard | 2-3 Diamond | 6 |
| 10-20 Amethyst Shard | 1 Emerald Block | 6 |
| 10-13 Amethyst Shard | 1 Ender Pearl | 3 |
| 7-10 Amethyst Shard | 2-5 Golden Carrot | 10 |
| 6-9 Amethyst Shard | 2-4 Bread | 10 |
| 4-8 Amethyst Shard | 3-5 Book | 10 |
| 3-4 Amethyst Shard | 6-10 Glow Berries | 10 |
| 6 Cloud Rod | 1 Music Disc (Light Canvas – Advance) | 3 |
| 1 Cloud Rod | 10-25 Amethyst Shard | 3 |
| 1 Chiseled Ancient Dripstone Shard | 10-25 Amethyst Shard | 10 |
| 2-3 Book | 3-5 Amethyst Shard | 7 |
| 1-3 Lapis Lazuli | 3-5 Amethyst Shard | 7 |
| 1 Ancient Spike | 1-2 Amethyst Shard | 30 |
The 12 to 48 Shard Enchanted Book sits in that pool twice, so it shows up more often than anything else on the list. Books are rolled fresh every time, taking any enchantment that belongs on a weapon, armor, a tool, a  Bow, a
 Crossbow or a
 Trident, at a random level between its minimum and its maximum.
Mending and Unbreaking sit outside those categories, so neither of them can ever turn up. It’s the one trade where you’ve no idea what you’re buying until the screen is open, so check each Stratling’s book before you spend on it.
The  Music Disc is the trade worth planning around, as 6
 Cloud Rods is the only way to get it. Cumulonimbus drops an
 Air Rune and a pair of
 Atmospheric Boots instead, and the disc isn’t in any Chest in the game, so a Stratling is the whole supply.
Rerolling the Offers
A Stratling’s offers aren’t fixed when it spawns. Every time the mob loads back in it rolls a fresh 7 out of the 16, so walking far enough away for the chunk to unload and coming back will hand you a different list. Quitting to the menu and loading the world again does the same thing.
All of that stops the first time you open its trade screen. Opening it marks the Stratling as traded with and saves the offers, and from then on it keeps that list whatever you do. It’s tracked per mob though, so the ones you haven’t opened keep rerolling, which is why it pays to open them one at a time.
Paying for the Trades
Almost everything on the list wants Amethyst Shards, and the temple’s own Chests are the quickest way to get them. Each Chest rolls on the list below somewhere between 5 and 15 times, so clearing the place out will usually leave you with plenty to work with. Amethyst Geodes are the other option if you’d rather not set a whole room on yourself.
Cloudy Temple Chest Loot

 String


 Gold Ingot
 Feather

 Iron Ingot

 Emerald


 Diamond Leggings
On top of this, every Chest rolls once more on a separate list, which is where the  Diamond Axe, the
 Saddle, the
 Name Tag and the occasional
 Enchanted Golden Apple come from. That roll is guaranteed, so no Chest in the temple is a complete waste.
Cloud Rods are easy to write off the first time you pick one up, since nothing about them tells you what they’re for until you’ve found a Stratling with the trade. Hovering Hurricanes drop 1 to 3 each and they turn up in the Chests as well.
Keep them rather than selling, as besides the Music Disc they’re what the  Wand Of Clouds and the Atmospheric Boots are built from. Selling one off for 10 to 25 Shards is fine once you’ve made what you want, less so before.
Drops
A Stratling drops nothing at all. There’s no loot table attached to it, so killing one leaves you with 5 experience and one fewer trader in the temple, and the offers it was carrying go with it. The  Diamonds, the
 Enchanted Books and the Music Disc all sit behind that trade screen, which is the only reason the mob is there.
That makes them the one thing in the Cloudy Temple you’re better off walking past. Everything else in the building is worth killing for what it leaves behind, whereas a Stratling is worth more alive than the 5 experience you’d get for the trouble.
Tips
Trade before you loot. The container rule catches people out because the Amethyst Shards you need for the trades are sitting in the same rooms as the traders, and once a room has gone hostile you’re waiting it out before anything will open. The Chests will still be there afterward, the calm Stratlings won’t.
Hold your sneak key when you’re only moving past one, as sneaking stops the trade screen opening entirely. It’s the same key that keeps you from opening a trade by accident while you’re backing away from a Hovering Hurricane, which is easy enough to do in a narrow doorway.
Bring your own stock rather than relying on the Chests. Books and  Lapis Lazuli both sell for 3 to 5 Amethyst Shards, and an
 Ancient Spike from a Spiky Worm has 30 uses on its trade, so a pile of those funds a lot of shopping.
 Chiseled Ancient Dripstone Shards are the big earner at 10 to 25 Shards each, and they come off an Ambusher.
If the Music Disc is what you came for, open one Stratling, check the list, and leave the rest alone if it isn’t there. The untouched ones will reroll their offers the next time the chunk loads, so you can come back and try again as often as you like, whereas opening them all in one visit locks in whatever you got.
With that lot in your inventory, a single temple’s worth of Stratlings will usually cover a couple of Enchanted Books and the Diamonds. That’s a decent return for a mob you never have to fight.
FAQ
The screen only opens while it has no target, so if you’ve hit one or opened a Chest or Barrel within 10 blocks of it, that’s what’s blocking you. Get 20 blocks clear and give it a moment to lose interest, then walk back in. Sneaking cancels the interaction as well, so check you aren’t holding your sneak key.
Its 7 offers get rolled fresh every time the mob loads back in, so leaving until the chunk unloads or reloading the world will give you a different list. That only works up until the first time you open its trade screen, as opening it saves the offers for good. Any Stratling you haven’t opened is still rerolling, which is why it’s better to check them one at a time.
Restocking isn’t something they do, as each offer has a fixed number of uses and that’s the lot. It runs from 2 on the expensive Enchanted Book up to 30 on the Ancient Spike, and once a trade is used up it’s gone on that mob permanently. There’s no leveling either, so the 7 offers you get are the 7 you keep.
Only from a Stratling, in exchange for 6 Cloud Rods. Cumulonimbus drops an Air Rune and a pair of Atmospheric Boots rather than the disc, and it isn’t in any Chest loot either. Hovering Hurricanes drop 1 to 3 Cloud Rods each, so the Rods themselves aren’t the hard part, finding a Stratling with the trade is.