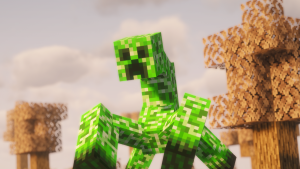
The Bomber is the Legendary Monsters mob tied to the Ruined Pyramid, a small sand-colored thing that runs at you and detonates. You’ll actually meet them out on the open dunes at night first, usually in groups, long before you ever locate a pyramid.
Most of it behaves like a  Creeper, the same 1.5 second fuse and the same hiss on the way in, though it moves a lot faster and the blast leaves you with the Curse Of Desert. Kill one before it reaches you and it’ll drop an
 Ancient Sandstone Shard, which is what the
 Blastproof Helmet and the
 Sand Cannon are both made from.
Spawning
Bombers are added straight into the Desert biome, so they’ll turn up anywhere on the sand once it’s dark enough, in groups of 1 to 4. They spawn often enough to be a regular part of a Desert night. That’s the only biome they’re added to, though the Ruined Pyramid also generates in a few of Oh The Biomes We’ve Gone’s Deserts and Badlands, and it brings them with it.
The Ruined Pyramid is the other place to find them, and it’s the steadier one. The pyramid overrides its own monster spawns, so inside the ruin the Bomber is the only hostile that will ever spawn, which is as close to a farm as you’ll get for them. Pyramids sit about 40 chunks apart, so they aren’t hard to come across once you’re in a big enough Desert.
Either way, you don’t need the pyramid to meet one. Any Desert at night has Bombers wandering it, and the pyramid just has them in a smaller space with a Dune Sentinel firing over the top.
Behavior
A Bomber will target you on sight and it goes after  Iron Golems too, though it won’t ever pick a fight with a
 Goat. Hit one and it turns on whatever hurt it, same as anything else.
Attacks
Its melee swing does nothing at all, no damage and no knockback, so the entire threat is the explosion it carries. What makes it different from the Creeper you already know is the speed, as it moves at 0.4 against a Creeper’s 0.25. Walking away in a straight line isn’t going to work, you either need to sprint with a head start or kill it at range.
Bomber
Creeper
The whole encounter runs in three stages, and the speed makes the first one far shorter than you’re used to with a Creeper. The second stage is the one you can still cancel, so that’s where your options are.
Closing In
Within 3 blocks
Nothing happens until it gets inside 3 blocks of you with a clear line of sight. Up to that point it’s just a fast mob walking at you, and it takes damage like anything else with 20 health and no armor.
The Fuse
1.5 seconds to react
It stops moving, starts swelling and plays the Creeper hiss, and you’ve got 1.5 seconds from there. The fuse winds back down if you break line of sight or get more than 7 blocks away, so a single sprint or a block placed between you is enough to cancel it. Killing it during the swell works as well, and that’s the only way you’re getting the drops.
The Blast
3 block radius, plus the curse
The explosion goes off at a radius of 3, the same size a Creeper makes, and it’ll chew through terrain unless you’ve turned mobGriefing off. It shakes the camera for anything within 10 blocks, which you can turn off with the Allow Camera Shake option in the config. The Bomber itself is removed rather than killed, so nothing is left on the ground.
Curse Of Desert
Everything living within 4 blocks of the blast, and 3 blocks above it, picks up Curse Of Desert III for 8 seconds. It turns your camera upside down, and that’s the whole effect, with no damage and no slow. That sounds harmless, but 8 seconds of inverted screen in a group of Bombers usually ends with you walking into the next one.
A  Milk Bucket clears it like any other harmful effect, so carry one on a pyramid run. The other way out is standing behind a raised
 Shield at the moment the Bomber goes off, since anything blocking is skipped over when the curse is handed out.
If you can’t get clear in time, raise your Shield and face it. Blocking removes you from the curse entirely, which matters far more than the explosion damage itself when there are 3 or 4 of them around you.
Lighting The Fuse
You can set one off by hand with  Flint and Steel or a
 Fire Charge, and it lights the fuse the instant you right-click, with no way to back out. Flint and Steel takes a point of durability for it, whereas the Fire Charge is consumed. It’s a handy way to clear Sand or open a wall in a pyramid, as long as you choose where it goes off.

Falls prime it too, and that’s the part that catches people out. Every block it drops adds to the fuse, so a Bomber that steps off the top of a pyramid lands almost fully charged and blows within a quarter of a second of hitting the ground.
It’s also hard to kill with a fall. While it’s chasing you it won’t take fall damage until it has dropped 22 blocks, though with no target that goes back to the usual 3, so don’t count on a drop to finish it.
Lightning charges them the same way it charges a Creeper, doubling the blast radius to 6. The difference is that a charged Bomber uses the exact same texture as a normal one, so there’s no blue glow warning you about it.
Drops
A Bomber that explodes drops nothing, as it dies in the blast like a Creeper does. Kill one before the fuse finishes and you’ll get both drops below every time, which is why the fight is about range rather than dodging.
Bomber Drops
 Ancient Sandstone Shard

 Gunpowder
Both drops are guaranteed and they come out glowing, which saves you hunting through the sand for them at night. They also last far longer than an ordinary drop before they despawn. Every shard you own has to come off a Bomber you killed first, and that’s the whole reason a  Bow is worth carrying out here.
The Ancient Sandstone Shard feeds two things, both of which also want a  Crystal Of Sandstorm from the Dune Sentinel. A Blastproof Helmet takes 4 shards, the Crystal and a
 Gold Nugget, while a Sand Cannon takes 4 shards, the Crystal and 4 Gunpowder. Since the Gunpowder drops off the same mob, one night of clearing a pyramid tends to cover both recipes.


The helmet gives 3 armor, the same as a Diamond one, with 2 armor toughness and a little knockback resistance on top. Its real job is the 35% explosion damage reduction, which covers  TNT and Creepers as well as Bombers. It’s repaired with
 Iron Ingots and holds 286 durability. If you’ve no use for either recipe, 4 shards in a 2×2 will also make a single
 Chiseled Sandstone.
Tips
Bring a Bow above anything else. With 20 health and no armor a Bomber goes down in three fully drawn shots or fewer, and killing it at range is the only way you’re collecting shards rather than watching them vanish with the explosion. Punch on the Bow helps as well, since knocking one past 7 blocks winds the fuse back down.
Clear the pyramid from the outside in, working the roof and the outer walls first. They spawn inside the structure one at a time rather than in packs, so pulling them out into open sand means you’re never dealing with two fuses at once. They’ll also fall on you from the upper tiers already half primed, so don’t stand directly under an edge.
Turn mobGriefing off if you want a base anywhere near a Desert. It stops the blasts from eating your walls, as the explosion respects that gamerule. The mobs still spawn and still detonate on you, you just stop losing blocks to them. With it on, Bombers can blow holes in the pyramid itself and open up routes you didn’t intend.
If you’d rather tune them, the config carries a Bomber Health Multiplier and a Bomber Damage Multiplier, both set to 1.0 by default. They’re filed under a second “Dune Sentinel Settings” heading in the config file rather than one of their own, so search for the word Bomber instead of scrolling for a section.
FAQ
A Bomber that detonates is removed from the world rather than killed, so the loot table never runs and nothing is left on the ground. It has to die to damage for the Ancient Sandstone Shard and the Gunpowder to drop, so that means a Bow, a thrown Potion or anything else that finishes it before it reaches you.
That’s Curse Of Desert, handed out to everything within 4 blocks of the blast for 8 seconds. Milk clears it the same as any other harmful effect, and holding a raised Shield as the Bomber goes off keeps you out of it entirely, since anything that’s blocking is skipped when the curse is applied. Staying outside 4 blocks works just as well.
The Ruined Pyramid, because the structure replaces its own monster spawn list with the Bomber and nothing else. Open Desert works too and gives you packs of up to 4 at a time, though you’ll be sharing the darkness with  Husks,
 Skeletons and the rest. Pyramids sit roughly 40 chunks apart, so one in walking distance is usually enough to keep you in shards.
It can, and a charged one doubles its blast radius from 3 to 6. The catch is that it keeps the same texture either way, so there’s no blue glow to warn you the way a  Charged Creeper has. The size of the hole it leaves is the only tell you get.